Friday, July 5, 2013

Lamp Redux

       
After                                                                                  Before
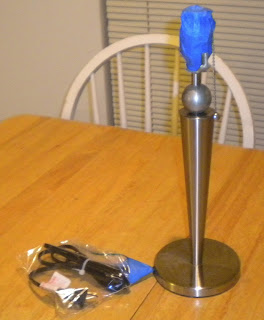
I had this lamp in my bedroom, but when I decided to be an adult and get two bedside tables, I got matching lamps for them and moved this out to the living room. It originally had a silver base but that didn't go so I spray painted it with the same black matte spray paint that I used for my mason jars.

I wasn't sure what to do with the lampshade - the blue really didn't fit with my decor, but I had no ideas for how to update it.  That is until I saw this fluer-de-lis printed burlap fabric at Joanne Fabrics. I wasn't looking for fabric for the lamp at the time, but when I saw this burlap I immediately knew I needed to find a way to incorporate it into my home.

Here's how I did it:

Step 1: Tape off where the light bulb goes and the cord so you don't spray them.  I used a plastic bag to wrap the cord instead of wrapping the whole thing in tape.

Step 2: Spray paint the base.  I actually didn't sand or prime the base because I knew I wasn't going to be touching it much, and the matte spray feels like it sticks pretty well.


Step 3: Make a template. I used parchment paper and rolled the lampshade across the table to trace the shade to make a template for the fabric. I traced the bottom and the top - note: a rectangular piece of fabric wont work because of the curve in the shade.


Step 4: Pin the template to the fabric.  I initially pinned it to the wrong side of the fabric, but then realized that I couldn't easily align the pattern that way.  So I pinned it to the right side (with the printing).  This is where having a transparent template really pays off because you can easily align the template on the pattern.

Step 4.5: (not pictured) Realize that because your fabric has a large pattern that can only go one way, cutting the whole template in on piece will end up with a really weird looking lamp.  Decide to do three panels.


Pin the template to the fabric

Align the template so the pattern looks good
Step 5: Cut the fabric around the template.  Note: you will want to leave room for errors.  I cut the template out about an inch bigger on each side and then cut the fabric out bigger than that.  I'd say I probably had about 2 extra inches, but in some places that was barely enough because of the way the pattern fell.


Step 6: Place the fabric on the shade to ensure it lines up well.  I pinned the fabric to the shade so that I could play with it until I got it to look the way I wanted.

I tried to make the pattern match up between
the panels as much as possible


Step 7: Glue fabric to shade. I used hot glue (be careful: it's hot!!) and used folded up parchment paper (because it wouldn't stick to the glue) to press the fabric to the shade. I glued at the top and bottom, just folding the fabric over and gluing along the inside of the shade.


Finished!
Step 8: Finishing touches.  Even after playing with the fabric for (not even kidding) hours, I still didn't love the way the pattern matched up between the panels.  So, I decided to glue jute twine along the edges to sort of buffer against any misalignment.  (Bonus: if you do something like this, you don't have to be as careful when gluing the edges together.)  Since I was going to have the twine accent running up and down the shade, I also decided to put it along the top and bottom.  I doubled the thread over to make it cover more area and be more noticeable.

**I made an extra lamp (it's actually the one pictured) and it is for sale on Etsy, check it out!**

Wednesday, July 3, 2013

Animal Bookends, Oh My!


I got this idea from (where else?) pinterest. It was a take on a Pottery Barn Teen set of bookends. The pin shows what I believe to be the PBT version. This is mine!


Notes:
1) I got the Elephants from the $1 section of Target 
    about 6 months ago (they were deceptively 
    $3/each)


2) I spraypainted them with Valspar Metallic Silver 
    Paint (available here)


3) I had a really hard time finding a block that I liked 
    the size of in reference to the elephants.  I ended 
    up wrapping a foam block from Michael's in a 
    heavy paper and spray painting that with a matte 
    black spraypaint.  You can see in the pictures that 
    didn't turn out p-e-r-f-e-c-t-l-y, but you can't really 
    notice the difference that the glue on the corners 
    makes unless you're really looking at it.


Related Notes (similar projects):
1) I made a set of these, using small elephants painted in gold metallic and small boxes with lids that I 
    painted black.  I just glued the elephants onto the boxes and gave them to my mother for Christmas.  
    Though she just put them on a side table right next to the couch, she said she liked them, and they do 
    look really good there.  I think I spent less than $5 on that project (yes, I got her something else).

2) I made a set of these for my brother using dinosaurs and painting them green and putting them on 
    little wooden plaques I found at Michael's, which I painted gold.  He did not like them, and wasn't 
    particularly shy about telling me so. (in his defense... they did turn out kind of crappy, I wouldn't use 
    a green gloss spray paint for the animals, it was too dark to pick out the details.)
Here they are on my mantle, above the TV.

3) I cut a lion in half (inspiration), painted it matte black, 
    glued them to a gold plaque and then glued the plaque to  
    those plastic picture frames that the pin suggests. But those 
    kinda suck because they're too flimsy, if I did it again I'd 
    spring for real metal bookends.  

       3b) Another note: cutting the plastic animal was pretty 
             difficult, even using a really good serrated            
             knife, I messed it up and had to glue part of it back 
             together - be careful with that.  

       3c) Another thing to watch out for is the placement of the
             animal halves - I tried to get them even, but they
             didn't line up the way I wanted because the lion's feet
            were too far down.

Secret Ingredient: Twine Pt. 2

Before
When I get a new craft idea, I usually end up buying a ton of crap that I don't end up needing so it sits around in my craft closet until I get sick of looking at it ...ehhehemm... I mean, until creative genius sparks.

So, after I finished my table, I still had a bunch of twine left over. I wasn't sure what to do with it for awhile, but then I got this awesome idea to wrap a picture frame in it. Well, it turns out it wasn't exactly the best idea... (after the jump).


After

After I finished my picture frame, I was so amped on twine that I decided to make a whole bunch more things! [I didn't mention that I ran out of twine 3/4 of the way through, left the frame sitting uncompleted for about 6 months, then wanted to just paint it, but taking the twine off was too labor intensive, so I put it back and let it sit for about another 6 months until I got sick of looking at it and went and bought some more twine and finished the project in about 20 minutes]


Close Up
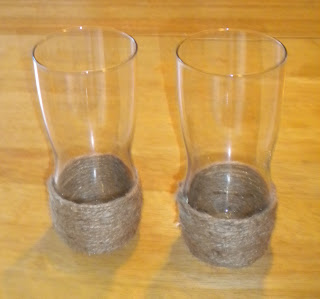
I'm not even going to put instructions for these. If you can't figure it out then you probably shouldn't be using a hot glue gun... which, coincidentally is what I used to glue the twine to these pieces. All of which I bought at my local Goodwill! Reduce! Reuse! Recycle! [my interpretation: re-do boring and ugly things so that the world is just that much more aesthetically pleasing!]


Pro Tip: Nail Polish remover gets permanent marker off glass and the like really well.

Super Pro Tip: Pam Cooking Spray, when sprayed and left on sticker residue will help it wash right off!

Here's what I came up with:  

Before (boring and dirty)
After (clean and interesting!)


Shameless Self-Promotion: These glass items are available at my Etsy Shop.

Tuesday, July 2, 2013

Secret Ingredient: Twine


I saw this Ikea Lack table covered in twine sisal over on IkeaHackers, and I was instantly in love.  A) it looks super sweet and B) I already had one of those tables.  Having pawned off it's POS coffee table mate on my parents, I just had this random black table.  Boooorrriiinnngggg.

So, I filed this idea away in the ole memory bank, bought some jute (which is smaller, and now that I'm looking at this picture again I realize why mine took forever and a year to finish ... no really.), and promptly set about not getting started until late one night when I didn't want to go out.

Anyway, here's my version.  It now holds my super sweet printer scanner.


I modified the original directions because there was no way in tarnation that I was going to glue all the twine down.  So I just glued it at the top and then I spread some glue over the twine every so often as I wrapped.

Notes:
1. I took the legs off to wrap them, so I could just twirl them around.

2. I wore latex gloves so I could smear glue under the twine as I went.  I pretty much just squeezed some glue onto newspaper and dipped my finger in every so often.


3. I couldn't figure out how to make the top square without actually gluing every strand (and, I repeat, there was no way in tarnation I was going to do that). So, I used some carpet tacks (tiny little nails - these are what you get when you go to home depot looking for upholstery tacks (another story)).


4. I basically held the tacks over the table using a pliers to hold them in place, then I hammered them in just a bit, then I wrapped the string around them and then hammered them in all the way.  You can get away with doing a few tacks at a time, you just have to do them from all sides.

5. this literally took forever and a year.  I ran out of twine when I was halfway through the top and really didn't want to deal with those stupid little tacks anymore, so I just put a placemat on top of it and no one was the wiser.  .... But then I did, eventually finish it.


Detail of the top